Overview
The QuickBooks Online integration is meant to create a seamless and efficient sync between Silo and QuickBooks data. The integration is a 1-way integration, meaning data is only pushed from Silo to QuickBooks, never the other way. Therefore, Silo is considered the source of truth for all data related to invoices, purchase orders, credits, and payments (Example: If an invoice is edited in QuickBooks and not in Silo, with the next sync the data of that invoice in Silo will override the data of that invoice in QuickBooks). It’s important to communicate clearly to users exactly how the integration will work and the best practices to ensure the integration works successfully.
Data
inventory, customer and vendor data need to match exactly for the integration to sync successfully. As part of the data processing step during onboarding, item names in QBO need to be mapped to the Silo Product catalog. If there are any discrepancies between item names, a new item with the name from the Silo catalog will be created in QBO with the next sync. Customer and Vendor names should match exactly between QuickBooks and Silo as part of data processing, but make sure to review before enabling the integration.
Settings
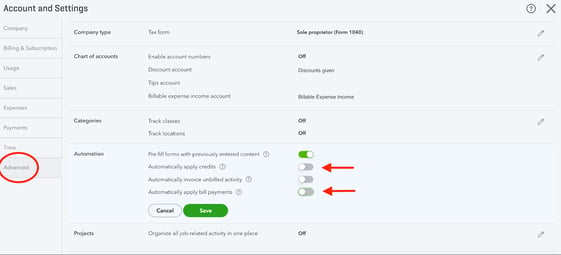
These settings need to be reviewed in the user's QuickBooks Online account before enabling the integration. IMs should review these with the users Accounting POC if possible.
QuickBooks Online Settings
- Go to Settings > Advanced or Sales > Automation and turn off the Automatically apply credits setting
- If this setting is left on, credits that are synced over from Silo will automatically be applied to the next invoice in QuickBooks Online, rather than when it’s applied in Silo, which will break the sync.
- Go to Settings > Advanced or Sales > Automation and turn off the Automatically apply bill payments setting
- If this setting is left on, bill payments may be applied differently in QuickBooks than in Silo, which will break the sync.
- Go to Settings > Sales > Sales order form content and review the custom fields. If it's not already listed, add a field for PO number to add that field to invoices.
- If all custom fields are being used and the PO number field cannot be added, the PO number from Silo will be added to the memo field on invoices with the text “PO #: 1111”

- If all custom fields are being used and the PO number field cannot be added, the PO number from Silo will be added to the memo field on invoices with the text “PO #: 1111”
Setting Up the Integration
- Open QuickBooks Online and Silo on two separate tabs or windows
- In Silo, navigate to Settings > Accounting and scroll down to the Integrations section. Turn on the toggle for QuickBooks Online.
- In the window that opens, select a date to begin syncing data and whether you'd like to sync AR data, AP data, or both. Once you confirm your selections, a green Connect to QuickBooks button should appear.
- Click the green button, and the page will be redirected to the Intuit App QuickBooks page with a dropdown to select the company file. Select the company you want to connect to, then press Next.
- The page will redirect back to Settings > Accounting in Silo. From there, fill in all of the required settings (marked with an asterisk *) to control which QuickBooks accounts your Silo transactions should automatically sync to.
- Determine whether users will want itemized invoices in QuickBooks. If so, toggle on the
Sync itemized invoices setting. - If your organization is using cascaded inventory items, review the Sync cascaded inventory items as parent inventory items to QuickBooks setting and confirm it is set appropriately to meet your needs.
- Select an account for each expense category in Silo to control which QuickBooks accounts expenses of these types will automatically sync to. Once you've completed your expense mappings, transactions should be able to start syncing successfully to QuickBooks Online!
Error Log
Any time an error occurs with the integration it will appear in the error log. If there are any sync errors, the error log can be accessed from the Settings > Accounting screen and also from a link in the top right of the Finance > Sales and Finance > Expenses screens.
As we continue to onboard new users to the integration, we will record and compile common errors that come up and how to fix them here: Error Log Cheat Sheet
Best Practices
In order to ensure success of the QBO integration for our users we must communicate key functions of the integration and best practices that allow it to run smoothly and efficiently.
- Silo is the source of truth for ALL accounting data. This means that any time an action is made in QuickBooks, that action will be erased and updated with the corresponding data that exists in Silo. It must be communicated to users that all actions must be made in Silo and not QuickBooks in order for the sync to work correctly. Actions include:
- Creating, editing, and cancelling sales orders
- Creating, editing, and cancelling purchase orders
- Creating, editing, and applying a vendor and customer credits
- Recording, editing, and unapplying vendor and customer payments
- Adding a new customers, vendors, and items
- Users should review the error log regularly to make sure the sync is functioning properly. The error messages should be straightforward and easy to understand with a clear explanation of the issue. If that is not the case, post the error in the support escalation channel for additional troubleshooting support.